In this tutorial we will make a simple, but complete, IVR Studio application.
First, the application will ask for a password, and then deal with correct and
incorrect passwords. It will also remember the caller IDs of callers who try too
many passwords. Once verified, the caller will be able to record a message. In this
example, we will assume that the password is:123. You can develop more secure password
mechanisms using databases or files, if you wish.
-
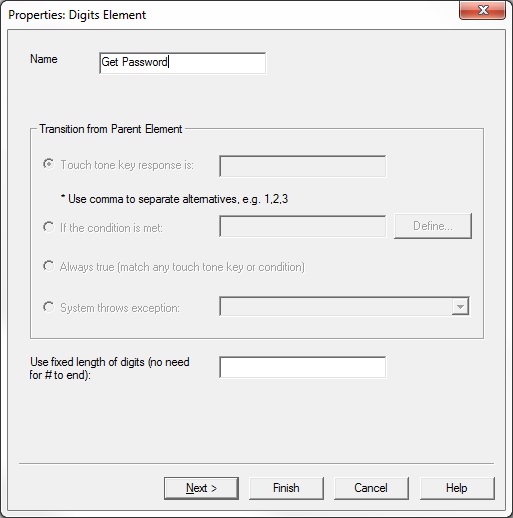
Create a digits element by right clicking Incoming Call. Then
click Add Next Element > Digits. Fill in the info as shown below. Then
click Finish.
An element defines a set of activities to be
carried out in the application, like a to-do list. This will make more sense as
you start to make the application. They make up the main structure.
A digits element is a specific type of element
that is be used to collect numbers. The digits element sets up the IVR to expect
a sequence of touch tone keys.
-
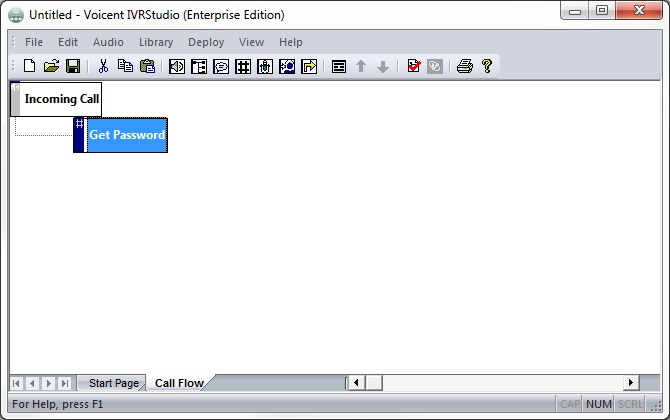
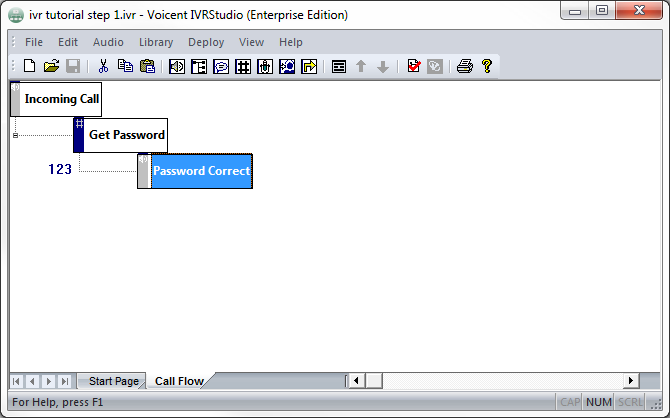
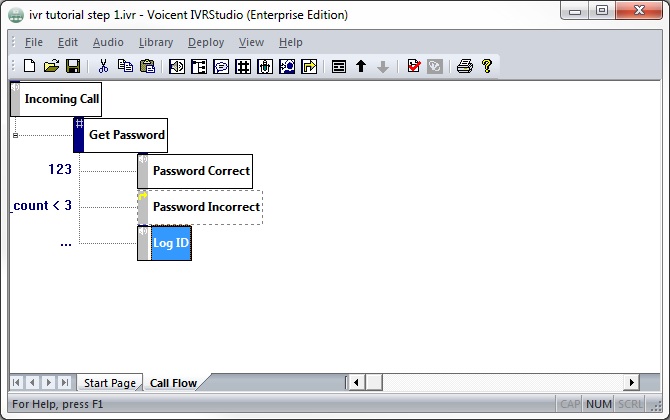
In the main screen, a new Get Password element has been created under
Incoming Call.
When a call is answered, the top element, Incoming Call is activated. When the
activities of Incoming Call are done, the application
transitions to the next element. A
transition is represented by the dotted line in between
two elements. They are automatically created when you add next element. A transition
shows which element will be activated next. Transitions are caused , for example, when
they press a number.
-
Save your application by selecting File > Save. Save the file name as "IVR
Tutorial Step 1".
The digits element, Get Password, is ready to collect a password. But it needs to
tell the caller what it is expecting.
-
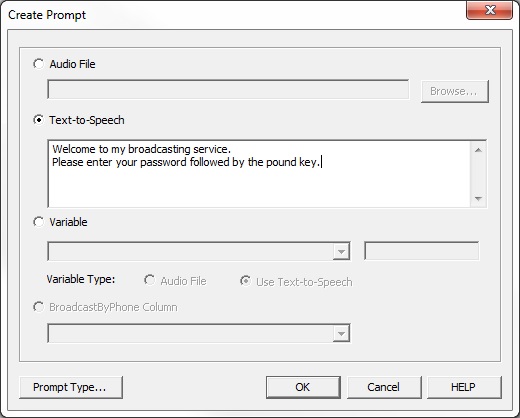
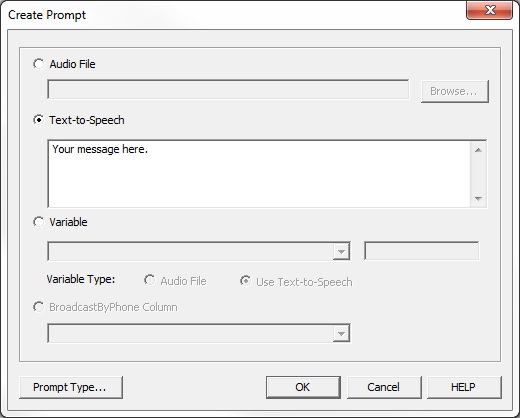
Right click Get Password, select Properties > Prompt > New. Select the
Text-to-Speech option, and enter the prompt as shown below. Click OK.
The message that tells the caller what to do is called a
Prompt. Remember to add a prompt everytime you want input,
otherwise the caller won't know what to do when the application waits for a response.
-
You can also use a pre-recorded audio file to play messages. For more info, see
Audio FAQ. For dynamic content, such
as the balance of a bank account, it is not possible to pre-record every call.
Text-to-speech must be used to generate dynamic audio.
Once a password is entered, the application needs to check if it is correct. If it is, it
will play a message and hang up.
-
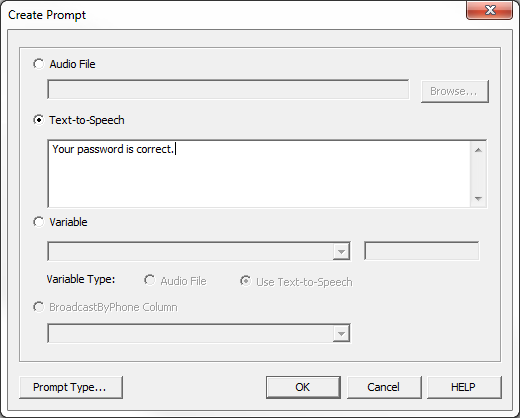
Create a prompt element by right clicking the Get Password element, select Add
Next Element > Prompt. Enter the information shown below, then click Next.
What a prompt element does is, simply, play the prompt
defined, and transition to the next element. You can specify conditions; this prompt will
only be activated if '123' is entered.
-
Click New. Choose Text-To-Speech and enter the prompt below. Then, click
OK and then Finish.
-
Your application should look like the following:.
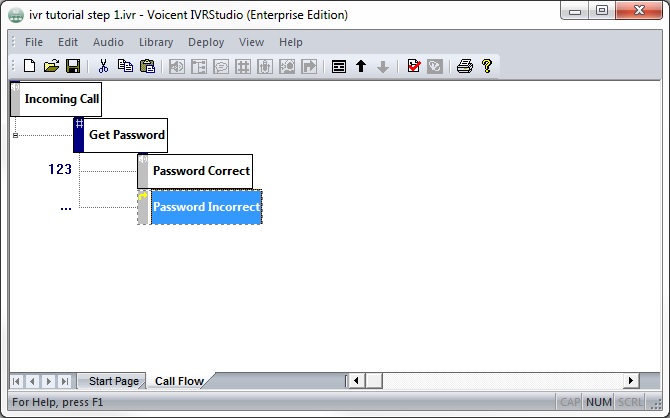
If the password is incorrect, the application will go back to Get Password and ask for
the password again.
-
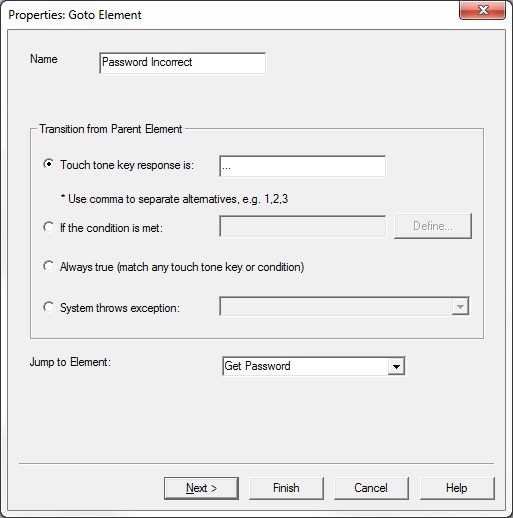
Create a go-to element by right clicking the Get Password element, select Add
Next Element > Go To. Enter the information shown below, then click Next.
A Go To element will "go to" a target element, instead of
going to the next element. This Go To element will go back to the Get Password element.
The "..." means that this element will activate when they press any key.
-
Click New. Choose Text-To-Speech and enter the prompt below. Then, click
OK and then Finish.
- Your application should look like the following:.
At this point, you have a simple, but complete, IVR application that can be deployed and
used.
-
Click the Validate button
 in the toolbar. If you have any errors, make sure that you have followed all of the instructions
above correctly.
in the toolbar. If you have any errors, make sure that you have followed all of the instructions
above correctly.
-
Click the Deploy button
 in the toolbar. Fill in the information shown below and click OK
Clicking this button will deploy the application on Voicent
Gateway.
- Restart Voicent Gateway by clicking the gateway icon
in the Windows
toolbar notification area. Press Stop. Then press the same button when it reads
Start.
You can see all deployed applications from the Application menu of Voicent Gateway. If you
have multiple inbound applications installed, make sure my_broadcast is your default
application. For more information, see
IVR Manage
Applications
-
Make sure answering incoming calls is enabled. You can check by going to Voicent Gateway.
Setup > Options > Inbound.
In this next step, we will limit the number of times a caller is allowed to attempt passwords to 3.
If they enter wrong passwords more than 3 times, the application will record their caller ID and hang
up.
-
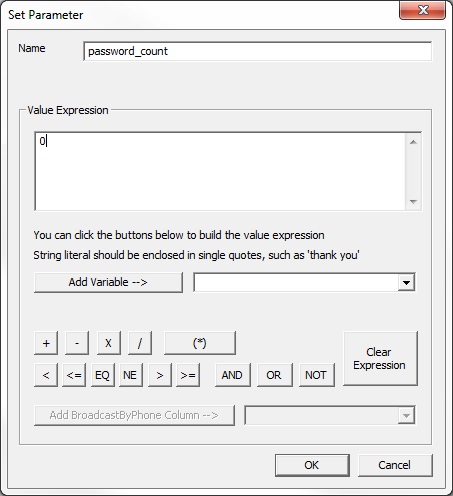
We are going to store the number of attempts in a variable. To create a variable, right click
Incoming Call. Click Properties > Variable > New. Then fill in the information
below. Note that the Value Expression is initially 0.
A variable is used to keep track of values. It is used to represent
a quantity. The value can be changed throughout the IVR application, but the variable name will
remain the same. All variables must be created on the top element. After they are created, they
can be used anywhere in the program.
-
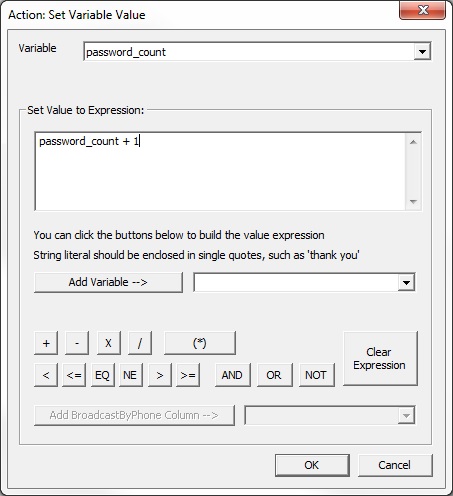
Every time the caller attempts a password, the password_count should increase by 1. So,
we will increment this variable in Get Password. To do this, right click the Get
Password element. Select Properties > Action tab > New > Set Variable Value >
OK. Fill in the information below.
Increasing a variable is an action. Actions are the first activities
that the element carries out when it is activated.
To increment a variable by 1, you type in "password_count + 1". This takes the value currently
stored in password_count, which is 0, and adds 1. Then, it stores the result back into
password_count. Now, password_count equals 1. It will continue to add 1 everytime
this element is activated.
-
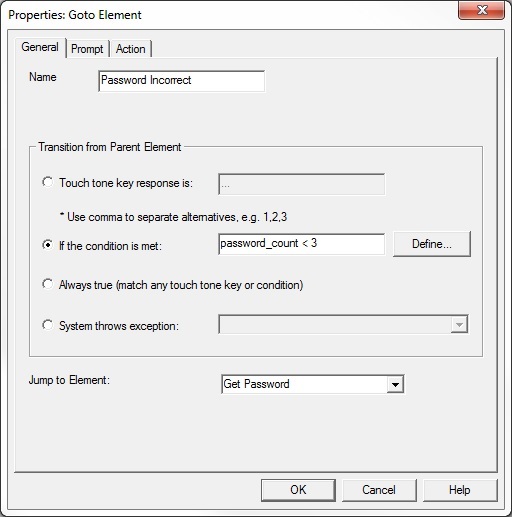
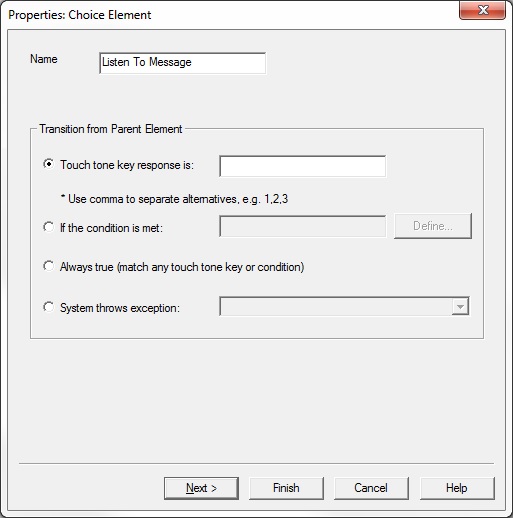
In order to limit the number of password attempts to 3, we will put a conditon on the Password
Incorrect element. To change the condition, right click Password Incorrect. Select
Properties and select "If the condition is met" option. Fill in as shown below.
-
You application should look like this.

|
So far, when an incoming call comes in:
- Incoming Call is activated and its activities are executed.
- The variable password_count is created.
- password_count is set to 0.
- The active element transitions to Get Password and it's activities are executed.
- The password_count variable is incremented by 1.
- Plays prompt message
- Since it is a digit element, it waits for caller input.
- If they enter 123, the application will transition to Password Correct.
- If they enter anything else, the application will transition to Password Incorrect.
- Since Password Incorrect is a Go to element, it will jump to Get Password.
- The active element transitions to Get Password and it's activities are executed.
- password_count is incremented to 2.
- Plays prompt message
- Waits for caller input.
- If they enter a wrong password again, Password Incorrect will be activated.
- It will jump to Get Password.
- The active element is Get Password.
- password_count is incremented to 3.
- Plays prompt message
- Waits for caller input.
- If they enter a wrong password again, the application will try to transition to Password Incorrect.
But since it does not meet its condition of password_count is less than 3, it tries the next element.
- Since there are none specified, the application ends and hangs up.
When a caller gets a password wrong 3 times, we are going to save their caller ID. We will add an element to
handle this situation.
-
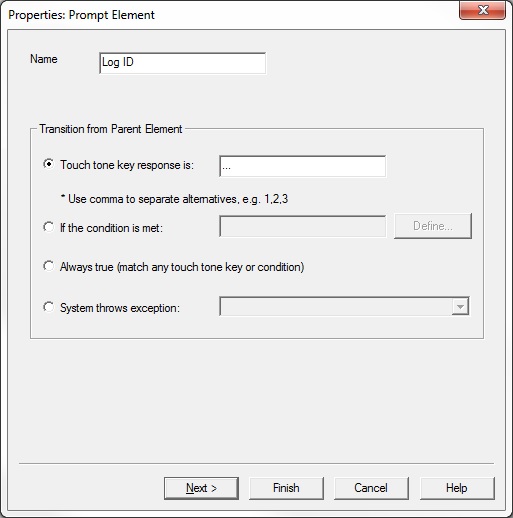
Right click Get Password, select Add Next Element > Prompt. Enter the info below.
We add "..." as the condition, because no matter what they typed in, we want to log the caller's ID.
-
Your application should look like this, so far.
When the password attempts is greater than 3, the Log ID element is activated.
-
The caller ID is a system variable.
System variables are created by the application and is read only.
Whenever there is an incoming call, the caller ID is saved in a variable called
__VG__CALLER_ID_NAME__.
-
We are going to use a log file to save all of the caller IDs. Right click Log ID, click
Properties < Action < New < Log Message < OK. From the new window, click Add to
make a new Log Message.
Log files are just text files that the program updates. Everytime
the Log ID element is called, it will create a new log message in the log file.
-
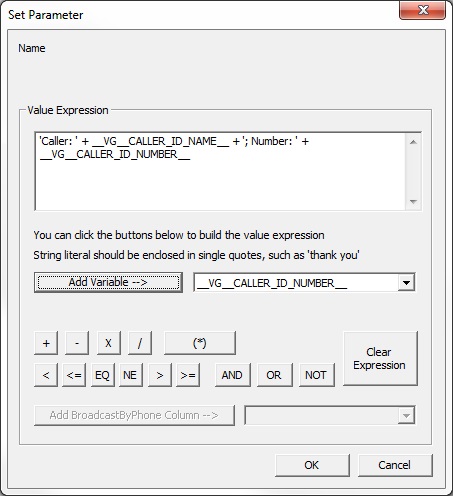
You don't have to type everything manually. It is actually better to use the buttons below to
prevent typos. First, type 'Caller: '. Text in single quotes will display that text exactly.
Then, type +. This will tell the application that you want to add a different type of text. Use
the Add Variable drop down menu and find __VG__CALLER_ID_NAME__. Then click Add Variable->.
Variables will diplay what ever value they hold. Follow the same pattern for the rest of the
message shown below.
The message that will be printed in the log file will look like: Caller: John Doe; Number:
123-456-7890.
Now, we are going to change the application. When the caller enters a correct password, instead of getting a
message, they will be asked to record a message.
-
Select the element Password Correct, press the delete key.
-
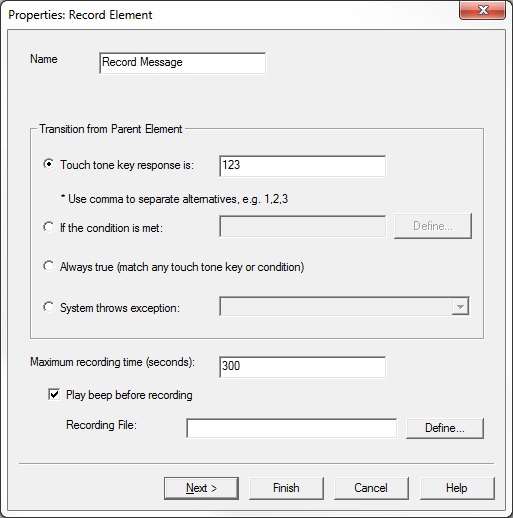
We are going to create a new element to get voice recordings. This element will be similar
to the Password Correct element. Right click Get Password, then click
Properties > Add Next Element > Recording. Fill in as shown. This will create a Record Element.
Record Elements play a prompt and then prepares the computer for a
recording input. As you can see above, the caller must type in the correct password, 123, in order to
move to this record element.
-
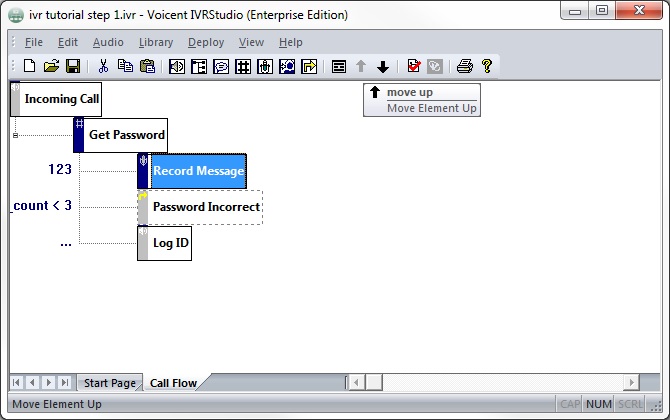
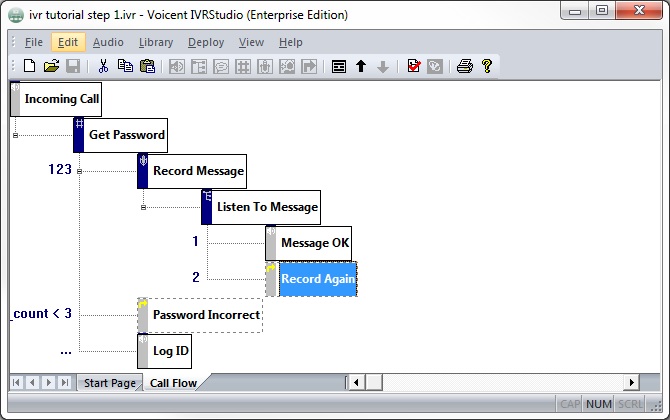
When this new element is created, it is added to the bottom of the list. Order matters. The
application will check the conditions of the elements in order. We want to check if the password
is correct before checking how many attempts there have been. Click on Record Message and click
the up arrow found in the tool bar until it is the top element.
-
The computer knows that we want an audio recording, but the caller doesn't. Add a prompt telling them
to start recording and press the # key when finished. Right click Record Message, Properties >
Prompt > New. Add a message.
After the caller records their message, we will play the message back. After, they can select if the
message is OK or if they want to record again.
-
Add a choice element after Record Message in the same way that you have been doing. Right click
Record Message, Properties > Add Next Element > Choice.
By leaving the responses empty, this element will play automatically.
-
Add two elements to Listen to Message. The first one is a prompt element named: Message OK.
The touch tone key response should be 1. The second element is a Go To element named: Record Again.
This key response should be 2. Create these yourself. If you need help, refer to how they were made earlier in
this tutorial. The result should look like:
Here we will play back the recorded message to the caller. Then give them the option to press 1 or 2.
-
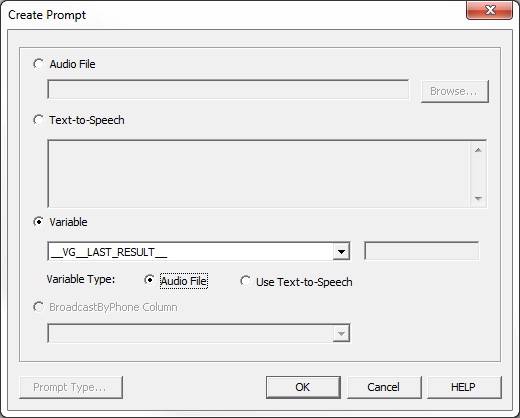
Select Listen to Message, click Properties > Prompt > New. Select the Variable option
and then select __VG__LAST_RESULT__ from the menu. Make sure the variable type is Audio File.
__VG__LAST_RESULT__ stores the last item the caller inputs. If the user inputs 2, then the last result will
be 2. Since the Listen to Message element always comes after Record Message, this variable will
contain that recorded audio file.
-
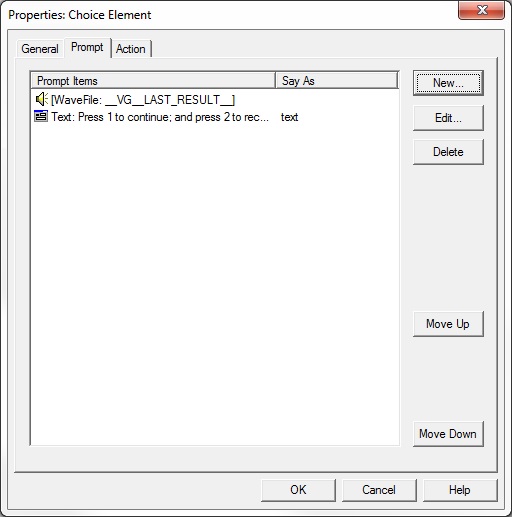
After the audio file is played back, the caller needs to be prompted with the options. Add the
prompt after __VG__LAST_RESULT__. Try adding it now. Your result should look something like this:
If you need a hint. Right click Listen to Message, select Properties > Prompt > New. Then
enter the text in Text-to-Speech.
|
|
|