Share This Post:
Setup Voicent Software with RingCentral
RingCentral is a VoIP phone service provider that you can configure Voicent software to use it.
Step 1: Collect RingCentral SIP Information
To configure Voicent software to use RingCentral, login to your RingCentral account here. If you do not have a RingCentral service you can find their plans here.
Proceed to select My Settings. (If you do not see My Settings, that means your RingCentral line is not setup correctly. You must contact Ringcentral support to change your lines to use your own softphone).
Under RingCentral Digital Lines, you should see all your extensions (lines) listed. Click on Setup Instruction, you should find your SIP setup information for each line. Also, you should see a pop up window containing the following information.
This is your SIP account information
SIP Domain: sip.ringcentral.com:5060
SIP ID: 18320000000
Password: 7000000
Authorization ID: 18320000000
Step 2: Setup Voicent with RingCentral
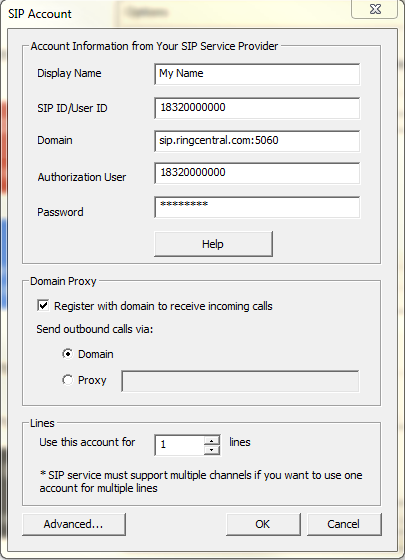
Use these values for the SIP setup of Voicent’s software. To add a new SIP account, travel to Setup > Options > SIP > Add.
Please note your SIP information may be different then the data found below.
Display Name: The name you want to display in the account
SIP ID/User ID: This is your RingCentral SIP/Authorization ID
Domain: This is your RingCentral SIP Domain
Authorization User: This is your RingCentral SIP/Authorization ID
Password: This is your RingCentral SIP Password (not your account password!)
Stun Server: Use any public stun server like stun.xten.com, use default port 3478
Currently, RingCentral has a channel limitation of 12, which is 12 SIP extensions, also called soft phones. If you need more, you can contact RingCentral and ask for more SIP extensions or soft phones. They need to set the Digital Lines to “other phones” so it can be configured as soft phone. Voicent Auto Dialer software acts as a set of soft phones. After RingCentral adds more SIP extensions (lines) in your account, you should login to your RingCentral account, select My Settings. Under RingCentral Digital Lines, you should see all your SIP extensions (lines) listed. Click on Setup Instruction, you should find SIP setup information for each line.
You should see that each line has a different SIP ID, username, and password. You need to add these SIP ID (lines) to Voicent software one-by-one. Open Voicent app, select Setup > Options > SIP, click the Add button. Enter the SIP information for that line. Make sure under lines, you set “use this account for 1 line“. It seems these lines have only 1 channel. Click OK when you’re done.
Now go back to your RingCentral Account, find the next line’s SIP information, then go back to Step 1 to add another line to Voicent’s software.
If you are not using RingCentral Office but just have a regular RingCentral account, here is the setup article to help you Configure RingCentral VoIP service.
Share This Post:

