
Send Personalized Emails
BroadcastByEmail has the ability to substitute variables for column text. A user can create however many columns they wish in the BroadcastByEmail spreadsheet and then access the information in the column cells using a simple statement.
The step by step directions below will guide you in using variables.
Suppose you operate a video shop and would like to send out email reminders to your customers for their overdue rentals. You would like to include the specific rental item in your email. The following example, with name and video title personalized, shows what a message might look like:
Here are the steps for designing and sending out personalized emails:
- Design a message template
- Set default value for variables
- Create an email list with required information by the message template
- Check personalized messages before sending out
- Send
Design A Message Template
A Message Template is a text or HTML file containing generic items called variables. Variables, denoted by ${variable name}, are items to be replaced by actual information in the email messages. For our example, type in the following:
Once finished, save the content to a file, such as You can save it as or if you would like to embed html tags save it as
Select from the program main menu. In the dialogue, click .
The dialogue will appear. Type in anything you like for template name, such as . Type in your email subject, for example, "${Title} Overdue Video Notice". (It is also OK to use variables in the email subject.)
Click the button. The dialogue should appear. Select the template file or you saved before. Click .
Set Default Value for Variables
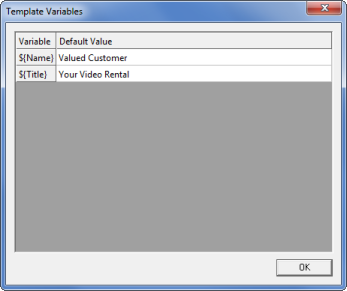
It is possible that some of the variables might not have a value for certain contacts. In that case, you will want to specify a default value for the variables without a value.
Let's suppose you might not always get a person's name in your mailing list. Instead of saying you want to say for your personalized message.
To set a default value for variables, in the dialogue, select the , and then click
If you selected the previously designed , you should see two variables listed: and .
Click the cell for , then type in . You may also want a default value for the title. These values will only be used if the corresponding cell in the spreadsheet is blank.
Click
Create an email list
Once you have designed your message template, you can create an email list just suitable for that message. from the program main menu. In the dialogue, select , click .
Now you should see a new column is added in the spreadsheet window. Fill in the information as much as possible. Save the document.
Please note you can copy-paste data from other programs or import a file to populate your spreadsheet.
Check Personalized Message
You can check your personalized message before sending it out. Select the row in the spreadsheet and then click the button on the toolbar (or select from the program main menu).
For example, if you have a row in the spreadsheet as
You should see the personalized message like the one you see in the beginning of the section.
You can also see the personalized message with variables replaced and highlighted. To do so, select any row in the spreadsheet, then click the (Highlight) button on the toolbar.
Send emails
To send email, select -> from the main menu. All steps are the same as sending out a generic email as described in the previous sections.
Video link: How to add variables to customize your emails